Why Flushing Your Tankless Water Heater is a Non-Negotiable Task
Flushing a tankless water heater with vinegar is essential for maintaining consistent hot water and preventing costly breakdowns. Here's what you need to know:
• Why flush? Mineral deposits from hard water accumulate inside your tankless heater, restricting water flow and reducing efficiency
• How often? At least once per year, or every 6 months if you have hard water
• What you'll need: A submersible pump, two hoses, a 5-gallon bucket, and 2-4 gallons of white vinegar
• Time required: 45-60 minutes for the actual flushing process, plus setup and cleanup
• The payoff: Restored water pressure, consistent temperatures, lower energy bills, and a heater that can last 20+ years instead of failing at 10-12 years
If you've noticed your hot water taking longer to arrive, water pressure dropping, or temperature fluctuating between scalding and lukewarm, mineral buildup is likely the culprit. Even tankless water heaters without storage tanks accumulate calcium and magnesium deposits on their heating elements. These minerals act as insulators, forcing your heater to work harder and longer to deliver hot water. The result? Higher energy bills, reduced performance, and potentially voided warranties if manufacturers find you've skipped this basic maintenance.
The good news is that flushing your tankless water heater with vinegar is straightforward enough for most homeowners to tackle. Vinegar is a weak acid that dissolves calcium deposits safely and effectively, without the harsh chemicals found in commercial descalers. It's food-grade, readily available at any grocery store, and costs a fraction of what you'd pay for specialized cleaning solutions.

Our tankless water heaters work tirelessly, heating water on demand as it flows through a series of narrow pipes and a heat exchanger. This ingenious design provides us with an endless supply of hot water and greater energy efficiency compared to traditional tank-style heaters. However, this continuous flow, especially in areas with hard water like much of Sacramento and its surrounding communities, leads to a silent, insidious enemy: mineral buildup.
These mineral deposits, primarily calcium carbonate and magnesium, cling to the inner surfaces of your heater's components. Over time, this "scale" acts like a blanket, insulating the heating elements and restricting the pathways for water. Imagine trying to heat a pot of water with a thick layer of rock on the bottom – it would take longer and use more energy, right? That's precisely what happens inside your tankless unit.
Regular flushing a tankless water heater with vinegar is the hero in this story. It's a non-negotiable task that directly impacts your system's longevity, efficiency, and your daily comfort. Without this crucial maintenance, mineral buildup can erode the walls inside your tank's heating chamber, reducing the area through which water can pass. This leads to a cascade of problems: decreased water pressure, fluctuating water temperatures, and ultimately, a premature failure of the unit. While a well-maintained tankless water heater can last 15 to 20 years, neglecting this simple flush can see its lifespan cut short to as little as 10 to 12 years. This small investment of time and effort annually can save you from significant repair costs or even a full replacement down the line.
Signs Your Tankless Heater is Crying Out for a Flush
Your tankless water heater is usually a quiet, dependable workhorse, but it has ways of telling you when it's struggling. Recognizing these signals can prompt you to perform a much-needed flush before minor issues escalate into major problems.
One of the most common complaints we hear is decreased water pressure when using hot water. As mineral deposits accumulate, they narrow the internal passages of your heater, literally choking off the water flow. If your shower suddenly feels less invigorating or your faucets are just a trickle when demanding hot water, scale buildup is likely the culprit.
Another tell-tale sign is fluctuating water temperatures. You might experience moments of scalding hot water followed by lukewarm or even cold bursts. This inconsistency happens because the heating elements are struggling to transfer heat efficiently through the layers of scale, leading to erratic performance. It's like your heater is trying to guess how much heat it needs, and often getting it wrong.
Keep an eye out for error codes displayed on your tankless unit. While these codes can indicate various issues, many are directly related to restricted flow or overheating caused by mineral buildup. Your heater's internal diagnostics are essentially flagging that something isn't right inside.
If you're noticing a longer wait for hot water to reach your tap, it's another clear indication. The heater is working harder and taking more time to bring the water up to temperature, consuming more energy in the process.
Finally, listen closely for strange noises coming from your tankless water heater. Gurgling, popping, or banging sounds often signal that water is getting trapped or boiling within scaled-up areas, creating steam pockets that collapse noisily. It's the sound of your heater struggling under the weight of mineral accumulation, a call for help that shouldn't be ignored.
The Impact of Water Hardness and Water Softeners
The quality of your water plays a significant role in how often your tankless water heater needs attention. Here in Sacramento, Elk Grove, Roseville, and many of our service areas, we often deal with what's known as hard water. But what exactly is hard water? It's not about how it feels, but about its mineral content. Hard water contains higher-than-average concentrations of dissolved minerals, primarily calcium and magnesium. While these minerals are generally harmless to consume, they are the primary culprits behind scale buildup in your plumbing system and, most notably, your water heater.
When hard water is heated, these dissolved minerals precipitate out of the water and form solid deposits, or "scale." This scale adheres to the heating elements and the inside of your tankless heater's heat exchanger. As we've discussed, this buildup acts as an insulator, making your heater work harder and less efficiently. It can also restrict water flow, leading to those frustrating symptoms like decreased water pressure and fluctuating temperatures.
So, how does water hardness affect the frequency of flushing a tankless water heater with vinegar? The harder your water, the more frequently you'll need to flush. While a general recommendation is at least once a year, homes with very hard water might benefit from flushing every six months. Some manufacturers base their recommendations on Total Dissolved Solids (TDS) levels:
• 0-60 ppm TDS: Flush every 18-24 months
• 61-120 ppm TDS: Flush every 6-12 months
• 121-180 ppm TDS: Flush every 4-6 months
• 181+ ppm TDS: Flush every 3 months
This is where a water softener enters the picture. A water softener removes the hardness-causing minerals from your water supply before it reaches your water heater. This significantly reduces the rate of scale buildup. If you have a water softener installed in your home, you might be able to extend your flushing intervals to every 3 to 5 years, rather than annually. However, it's crucial to understand that even with a softener, periodic flushing is still necessary. Softeners aren't 100% effective at removing all minerals, and a small amount of buildup can still occur over several years. Think of it as preventative care: a water softener reduces the workload, but an occasional flush ensures everything stays pristine.
Ready to give your tankless water heater the spa treatment it deserves? Before we dive into the step-by-step process of flushing a tankless water heater with vinegar, let's gather all the tools and supplies you'll need. As you can see in the image, having everything on hand before you start will make the process smooth and stress-free.
You don't need a professional plumber's truck full of gadgets for this job. Most of these items can be found at your local hardware store or even in your pantry:
• Submersible Utility Pump (1/4 or 1/6 HP): This small, inexpensive pump is the heart of your flushing kit. It will circulate the vinegar solution through your water heater. A horsepower of 1/4 to 1/6 is typically sufficient.
• Two Washing Machine Hoses (3/4 inch connectors): Standard washing machine hoses are perfect for this task. The 3/4 inch NPT thread connectors will fit snugly onto your tankless water heater's isolation valves.
• 5-Gallon Bucket: A clean bucket will hold your vinegar solution and allow for proper circulation.
• 2-4 Gallons of Food-Grade White Vinegar: This is your cleaning powerhouse! While some smaller units might only need a gallon or two, having 4 gallons ensures thorough circulation, especially if your pump struggles to maintain prime with less liquid. We're using food-grade white vinegar because it's effective, safe, and doesn't leave harmful residues.
• Channel-Lock Pliers: These can be handy for tightening or loosening hose connections or valve caps, if needed.
• Towels or Drop Cloth: Accidents happen! Laying down some old towels or a drop cloth around your water heater will protect your flooring from any spills.
Safety First: Important Precautions
While flushing a tankless water heater with vinegar is a relatively safe DIY task, we can't stress enough the importance of safety. A little caution goes a long way in preventing injuries or property damage.
1. Protective Gloves and Safety Glasses: Vinegar is an acid, and while it's mild, it can cause irritation if it gets into your eyes or on sensitive skin. Always wear protective gloves and safety glasses to shield yourself from splashes.
2. Proper Ventilation: Ensure the area where you're working is well-ventilated. While vinegar fumes aren't toxic, they can be strong and unpleasant in an enclosed space. Open a window or door if possible.
3. Handling Vinegar: Treat vinegar with respect. Avoid mixing it with other cleaning agents, especially bleach, as this can create dangerous fumes. If you spill any, wipe it up promptly, as vinegar can etch concrete floors.
4. Electrical Safety: You'll be working with an electrical pump. Ensure your hands are dry when plugging or unplugging it. If your water heater is electric, you'll be turning off its circuit breaker, which is a critical safety step. If your water heater is gas-powered, you'll be turning off the gas supply. If you're ever uncomfortable working with gas or electricity, that's a perfect time to call in the professionals.
5. Cool Down Period: Allow the water inside the tankless water heater to cool down before you start. This prevents the risk of scalding if any hot water escapes during the process.
By taking these simple precautions, you can confidently and safely perform this essential maintenance task.
The Step-by-Step Guide to Flushing a Tankless Water Heater with Vinegar
Alright, it's time to roll up our sleeves and get this done! Flushing a tankless water heater with vinegar might seem daunting at first, but by following the steps pictured here carefully, you'll have your unit performing like new in no time. The entire process, from setup to clean-up, typically takes about 1 to 2 hours, with the actual vinegar circulation lasting 45-60 minutes.
Step 1: Preparing for Flushing a Tankless Water Heater with Vinegar
Preparation is key to a smooth flush. Don't skip these initial steps!
1. Turn off Power and Gas Supply: Safety first! For electric tankless water heaters, locate the dedicated circuit breaker in your electrical panel and flip it to the "off" position. For gas tankless water heaters, turn the gas supply valve to the "off" position. This prevents the unit from firing up unexpectedly during maintenance.
2. Close Water Isolation Valves: Your tankless water heater should have a set of isolation valves (also known as service valves) on the hot and cold water lines leading into and out of the unit. These are typically marked and might have T-shaped handles. Turn them perpendicular to the pipes to shut off the water flow. This prevents cold water from entering the heater and hot water from leaving it.
3. Relieve System Pressure: Once the water supply is off, carefully remove the purge port valve caps (small caps on the isolation valves). Do this slowly, as a small amount of water or pressure might escape. This step is crucial to relieve any built-up pressure and prevent hot water from unexpectedly shooting out. Ensure you don't lose the small rubber sealing discs inside these caps, as they are essential for preventing leaks later.
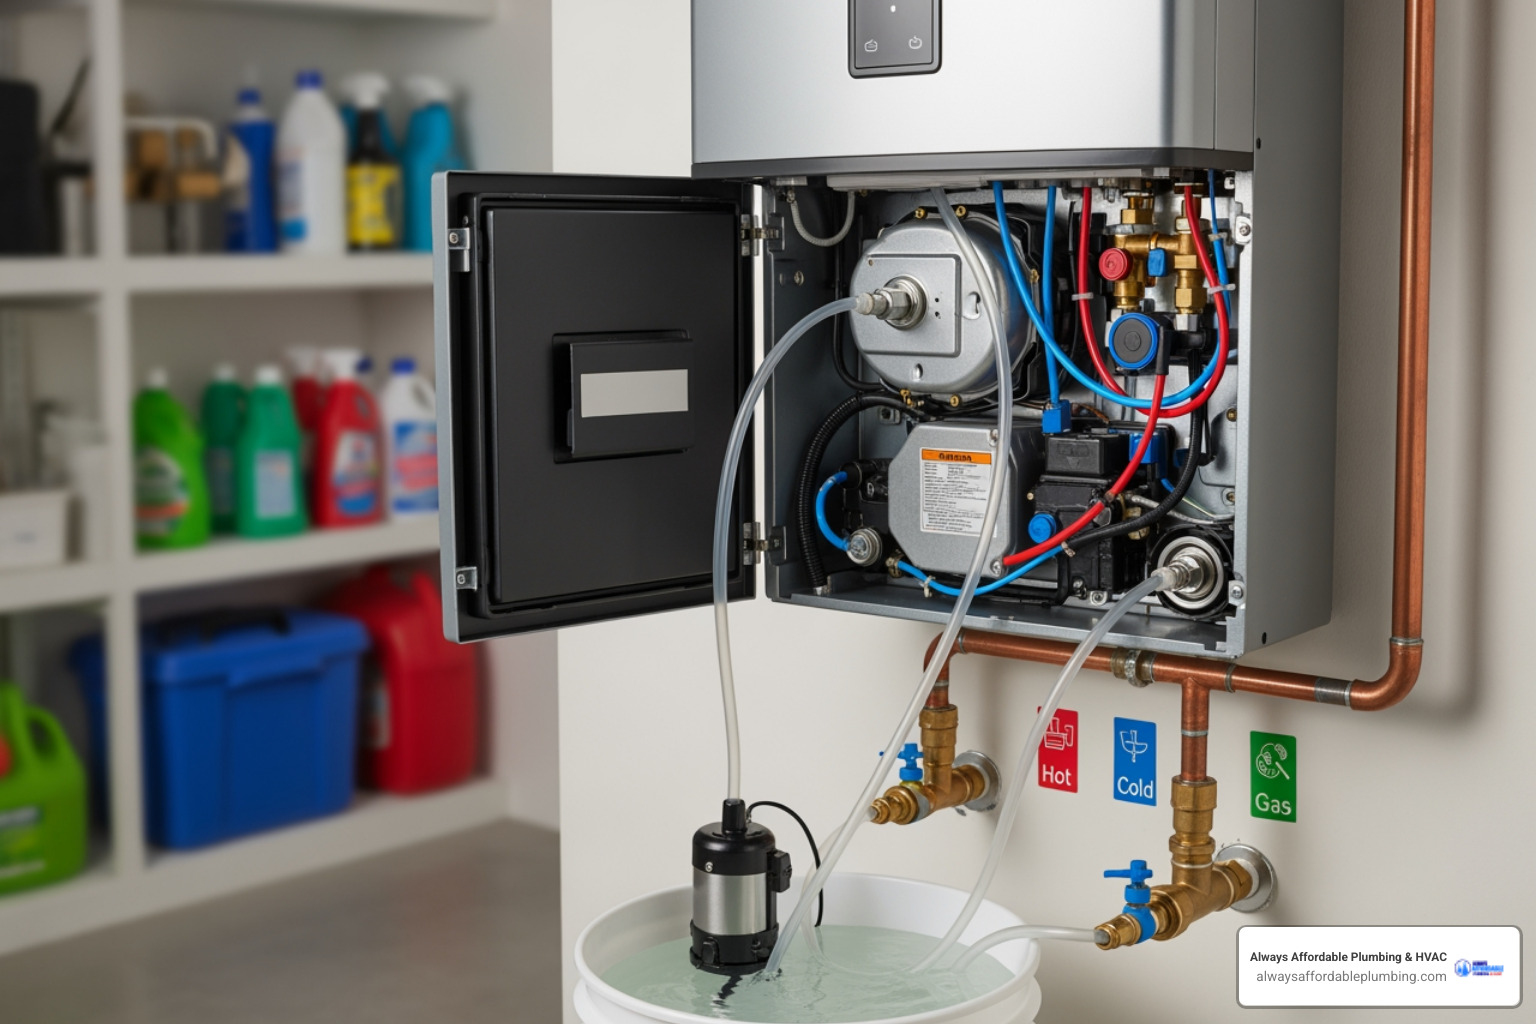
Step 2: Connecting the Hoses and Pump
Now that the system is safely isolated, we'll set up our flushing loop.
1. Attach Hoses to Purge Port Valves: Connect one of your washing machine hoses to the cold water purge port valve (often blue or marked 'inlet'). Connect the other washing machine hose to the hot water purge port valve (often red or marked 'outlet'). Make sure these connections are hand-tight, then give them an extra quarter-turn with your channel-lock pliers if needed, but don't overtighten.
2. Connect Pump to Cold Water Line Hose: Take the end of the hose connected to the cold water purge port and attach it to the outlet of your submersible pump.
3. Place Pump and Hot Water Line Hose in Bucket: Place the submersible pump into your clean 5-gallon bucket. Take the free end of the hose connected to the hot water purge port and place it into the same bucket. Ensure this hose end is submerged in the bucket to prevent spills and ensure continuous circulation. You've now created a closed loop system for your cleaning solution!
Step 3: Circulating the Vinegar Solution
This is where the magic happens – the vinegar gets to work!
1. Pour Vinegar into Bucket: Carefully pour 2 to 4 gallons of food-grade white vinegar into the 5-gallon bucket, ensuring the submersible pump is fully submerged in the solution. The exact amount might depend on your pump's ability to maintain prime, but generally, more is better for effective circulation.
2. Turn on Pump: Plug in your submersible pump. You should immediately see the vinegar solution circulating through the hoses, into your tankless water heater, and back into the bucket. This continuous flow allows the vinegar to dissolve the mineral deposits.
3. Circulate Solution (45-60 minutes): Let the pump run and circulate the vinegar for at least 45 minutes to an hour. For homes with particularly hard water or if it's been a while since your last flush, you might extend this to 1.5-2 hours. During this time, keep an eye on your setup for any leaks. This is your heater's deep-cleaning session!
Finishing the Job: Rinsing, Restarting, and What to Avoid
You're almost there! Once the vinegar has done its job, the next steps, like the clean water rinse pictured here, involve thoroughly rinsing the system and bringing your tankless water heater back online.
Step 4: The Rinsing and Restarting Process After Flushing a Tankless Water Heater with Vinegar
Proper rinsing is crucial to ensure no residual vinegar taste or smell lingers in your hot water.
1. Drain Vinegar: Unplug the submersible pump. Carefully remove the hoses from the purge ports and drain the used vinegar solution from the bucket. You might notice the vinegar is discolored (more on that later!) and contains some mineral flakes. Dispose of the used vinegar responsibly; it's generally safe to pour down a drain that leads to a municipal sewer system.
2. Fill Bucket with Fresh Water: Rinse out your 5-gallon bucket thoroughly, then fill it with fresh, clean water.
3. Circulate Fresh Water (5-10 minutes): Reconnect your pump and hoses as before, ensuring the pump is submerged in the fresh water. Plug in the pump and let it circulate the clean water through your tankless unit for 5 to 10 minutes. This flushes out any remaining vinegar and loosened sediment.
4. Disconnect Hoses and Close Purge Ports: Unplug the pump again. Disconnect both washing machine hoses from the purge port valves. Replace the purge port valve caps securely, making sure the rubber sealing discs are in place.
5. Restore Water, Gas, and Power: Now, reverse the initial steps. Open the cold water isolation valve first, then the hot water isolation valve. This allows fresh water to refill the system. For gas units, turn the gas supply back on. For electric units, flip the circuit breaker back to the "on" position.
Step 5: Cleaning Filters and Final Checks
A few final touches will ensure your system is in top shape.
1. Clean Inlet Water Filter: Many tankless water heaters have an inlet water filter or screen located on the cold water intake. Consult your owner's manual to locate and remove it. Rinse this filter under running water to remove any debris or sediment. If it's heavily clogged, you can soak it in a bit of fresh vinegar before rinsing. Reinstall it securely.
2. Check for Leaks: With the water and power restored, visually inspect all connections around the water heater, especially where you attached and detached hoses, for any signs of leaks. Tighten any connections as needed.
3. Run Hot Water Tap to Purge Air: Go to the nearest hot water faucet in your home and turn it on slowly. Let the hot water run for a few minutes. You might hear some sputtering or spitting noises – this is just air being purged from the lines. Continue running the water until it flows steadily and smoothly, typically for 2-3 minutes. This also helps flush out any last traces of vinegar from your internal plumbing.
4. Check Manufacturer's Manual for Model-Specific Tips: While this guide provides a comprehensive overview, always refer to your specific tankless water heater's owner's manual for any unique flushing procedures or recommendations pertinent to your model.
Common Mistakes to Avoid
To ensure a successful and safe flush, steer clear of these common pitfalls:
• Using Chemical Descalers: While commercial descaling solutions exist, we strongly recommend against them for DIY flushing. Many manufacturers advise using only food-grade white vinegar. Chemical descalers can be harsh, potentially damaging internal components if not used correctly, and pose health risks if they aren't completely flushed from your system. Vinegar is effective, safe, and readily available.
• Forgetting to Relieve Pressure: Skipping the step of slowly removing the purge port caps before disconnecting hoses can lead to a sudden, hot spray of water, which is both messy and dangerous.
• Not Rinsing Thoroughly: If you don't rinse the system adequately with fresh water after the vinegar flush, you might notice a lingering vinegar taste or smell in your hot water. While not harmful, it's certainly unpleasant!
• Incorrect Hose Connection: Always ensure you're connecting your pump to the cold water inlet side and the return hose to the hot water outlet side. Reversing these connections won't effectively circulate the cleaning solution through the heat exchanger.
Frequently Asked Questions about Descaling Your Heater
We often get questions about tankless water heater maintenance. Here are some of the most common ones we hear:
How often should a tankless water heater be flushed?
This is one of the most frequently asked questions, and the answer often depends on your water quality. As a general rule of thumb, we recommend flushing a tankless water heater with vinegar at least once a year. This annual maintenance helps prevent the accumulation of mineral deposits that can hinder performance and shorten your unit's lifespan.
However, if you live in an area with particularly hard water (which is common in many parts of Sacramento, Elk Grove, and Folsom), you might need to increase this frequency. For very hard water, flushing every 6 months could be beneficial.
On the flip side, if you have a water softener installed in your home, it significantly reduces mineral buildup. In this case, you might be able to extend your flushing interval to every 3-5 years. Even with a water softener, periodic flushing is still a good idea to catch any residual minerals that might accumulate. Always refer to your specific manufacturer's recommendations, as they may vary.
Can flushing a tankless water heater damage it?
When done correctly, flushing a tankless water heater with vinegar is a safe and beneficial maintenance task. In fact, neglecting to flush it is far more likely to cause damage! However, if done incorrectly, there are potential risks.
For instance, using harsh chemical descalers instead of food-grade vinegar can corrode internal components. Failing to properly shut off water and power can lead to leaks or electrical hazards. Incorrectly reconnecting hoses or not sealing purge ports can cause water damage. If something goes wrong during a DIY flush, it could lead to costly repairs or even water damage remediation.
Another critical point: improper maintenance, or a complete lack thereof, can void your tankless water heater's warranty. Manufacturers often require proof of regular flushing to honor warranty claims, especially for issues related to scale buildup. If you're ever unsure or uncomfortable performing the flush yourself, it's always best to call a professional. We're here to help you avoid potential pitfalls and ensure your unit is serviced safely and effectively.
What does the discolored water mean after flushing?
When you drain the used vinegar solution after flushing, you might notice it's no longer clear. Instead, it could be cloudy, contain small mineral flakes, or even have a distinct blue or green tint. Don't panic! This is usually a perfectly normal and even welcome sign that the flushing process has been effective.
The cloudy appearance and mineral flakes are simply the dissolved calcium and magnesium deposits that the vinegar has broken down and dislodged from inside your tankless water heater. This is the "gunk" we're trying to get rid of, so seeing it means your efforts paid off!
The blue or green color in the used vinegar indicates minor copper corrosion. Tankless water heaters often use copper in their heat exchangers due to its excellent thermal conductivity. Vinegar, being a mild acid, can react with tiny amounts of this copper. This is typically a very small, normal amount and is not a cause for concern or an indication of significant damage to your unit. It simply means the vinegar has done its job of cleaning the copper surfaces as well. Just remember to rinse thoroughly to clear out all the discolored water and any remaining sediment.
Keep Your Hot Water Flowing with Proper Maintenance
Your tankless water heater is an investment in comfort and efficiency for your home in Sacramento and the surrounding areas. Regular maintenance, especially flushing a tankless water heater with vinegar, is not just a chore; it's a critical component of protecting that investment. By consistently performing this simple yet powerful task, you ensure your unit operates at peak energy efficiency, delivers consistent hot water pressure and temperature, and enjoys a longer, more reliable lifespan.
While we've provided a comprehensive guide to empower you with the knowledge to perform a DIY flush, we understand that not everyone has the time, tools, or comfort level to tackle plumbing tasks. That's perfectly fine! For those who prefer peace of mind or simply want the job done right the first time, our team at Always Affordable Plumbing & HVAC is always ready to assist. We provide comprehensive plumbing, heating, and AC services across Sacramento, Elk Grove, Roseville, Citrus Heights, and all the surrounding communities. Our quality, transparent, and affordable full-service solutions ensure your tankless water heater receives the expert care it deserves, helping you avoid costly repairs down the line.
Whether you choose to DIY or call in the pros, consistent maintenance is the key to endless, efficient hot water.
Schedule your water heater service