Why Your Water Heater Deserves Better Than Neglect
How to purge a water heater is simpler than most homeowners think, and it's one of the most important maintenance tasks you can do to keep your hot water flowing and your energy bills in check. If you live in Sacramento or the surrounding areas, you already know how hard water can wreak havoc on appliances—and your water heater is taking the brunt of it every single day.
Quick Answer: How to Purge a Water Heater
1. Turn off the power (flip the breaker for electric units, or set gas units to "pilot")
2. Turn off the cold water supply valve at the top of the tank
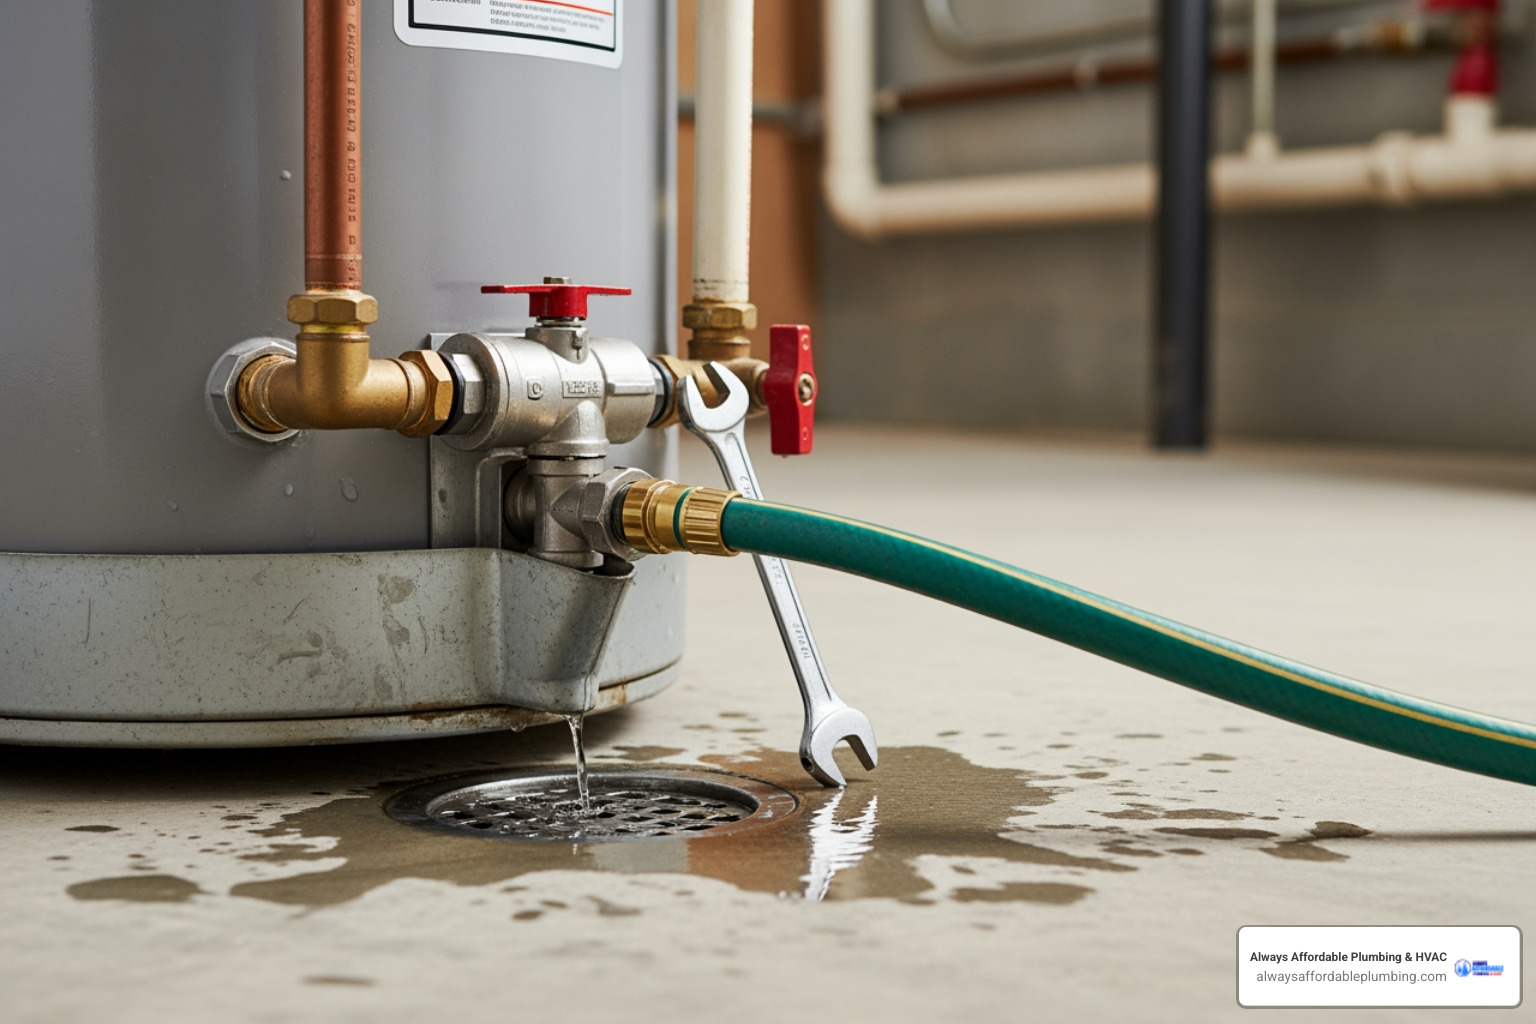
3. Connect a garden hose to the drain valve at the bottom
4. Open a hot water faucet in your home to allow air in
5. Open the drain valve and let the tank empty completely
6. Flush the tank by briefly turning the cold water back on (with drain still open) until water runs clear
7. Close the drain valve, refill the tank, and restore power
So what exactly is purging? It is the process of flushing out sediment—those minerals and particles from your water supply that settle at the bottom of your tank like sand in a bucket. Over time, this buildup makes your water heater work harder, heat water slower, and wear out faster. Purging (also called flushing) clears out that sediment, restoring efficiency and extending your heater's lifespan. Whether you're dealing with rumbling noises, lukewarm showers, or just want to prevent future problems, regular purging keeps your system running at peak performance.
For more insights on maintaining your water heater's health, check out our guide on signs your home water heater is failing. And if you're facing a more urgent issue or simply want professional help, contact Always Affordable Plumbing & HVAC for expert water heater service in Sacramento.

Before you dive into the nitty-gritty of how to purge a water heater, it is crucial to understand why this maintenance is so important, what clues your water heater might be giving you, and what preparations you need to make. Without proper care, mineral sediment from the water in areas like Sacramento, Elk Grove, and Roseville can build up, reducing your water heater's capacity, hindering efficient heating, and leading to premature wear and tear. This ultimately helps prevent costly repairs and supports lower energy use.
Signs Your Water Heater Needs Flushing
Your water heater is usually a quiet workhorse, but when it starts to act up, it's often trying to tell you something. These signals usually point to a build-up of sediment, indicating it's time to purge:
• Rumbling or Popping Noises: That strange symphony coming from your utility closet is likely sediment at the bottom of the tank heating up and creating steam bubbles that burst, making those unsettling sounds.
• Lukewarm Water or Running Out Quickly: If your hot showers are getting shorter or less intense, it means sediment is insulating the heating element, making it less efficient. The water heater struggles to heat the water effectively, leading to a reduced amount of hot water over time.
• Cloudy Water or Visible Sediment: When you turn on your hot water tap, especially after it's been sitting for a while, do you see cloudy water or small particles? That is sediment making its way into your household water supply.
• Reduced Water Flow: Sediment can not only clog the bottom of your tank but also restrict water flow through your pipes and fixtures.
• Non-Hollow Sound When Tapping the Tank: If you tap the bottom of your water heater, it should sound relatively hollow. A non-hollow, muffled thud can indicate a significant amount of sediment buildup.
• No Water Coming Out When Drain Valve is Opened: This is a clear sign that the drain valve itself is clogged with sediment, making purging difficult or impossible without professional intervention.
Ignoring these signs can lead to more serious problems, such as a water heater leaking in Granite Bay CA, which can cause significant damage to your home.
Gathering your tools before you start will make the purging process much smoother. Here are some basics you will likely need:
• Garden Hose: A standard garden hose long enough to reach from your water heater's drain valve to a suitable drainage location (floor drain, utility sink, or outdoors).
• Bucket: A sturdy bucket (5-gallon is ideal) to collect water for inspection or if you do not have a direct drain.
• Adjustable Wrench or Pliers: For turning off the cold water supply valve or the drain valve if it is stiff.
• Screwdriver: May be needed to adjust certain valves or access panels.
• Work Gloves: To protect your hands.
• Safety Goggles: To protect your eyes from splashing water or sediment.
• Teflon Tape (optional): If your drain valve connection seems a bit leaky, this can help create a better seal.
• Towels or Rags: For any spills.
Critical Safety Precautions
Safety should always be your top priority when working with home appliances, especially those involving water, electricity, or gas.
• Turn Off the Power/Gas: This is non-negotiable. For electric water heaters, switch off the corresponding breaker in your electrical panel. For gas water heaters, turn the gas valve to the "Pilot" position or completely "Off" on the control unit. This prevents the heating elements from burning out (in electric units) or the burner from firing (in gas units) while the tank is empty or partially filled, which can cause significant damage and be a fire hazard.
• Let the Water Cool: Hot water can cause severe burns. If possible, let the tank cool off overnight before draining. If you're in a hurry, you can run hot water from a faucet for several minutes to drain some of the existing hot water, but always proceed with caution.
• Wear Protective Gear: Always wear gloves and safety goggles to protect yourself from hot water, splashing sediment, or any unexpected issues.
• Locate Your Water Shut-Off Valve: Know where your main water shut-off valve is in case of an emergency.
• Never Force Valves: Water heater drain valves can sometimes be stiff or clogged with sediment. Never force a valve open or closed, as this can break it, leading to a much bigger problem.
• Know When to Call a Professional: If you're uncomfortable working with gas or electricity, if your water heater is very old (10+ years), or if you encounter any problems like a stuck drain valve, it is always best to call a professional. Attempting a DIY fix on an old unit might expose more serious underlying issues. The Always Affordable Plumbing & HVAC team is ready to help with water heater repair in Davis CA and surrounding areas.
How to Purge a Water Heater: Step-by-Step Instructions
Now that you're prepped and ready, let's get down to the actual process of how to purge a water heater. We will cover both tank and tankless models, as their maintenance procedures differ significantly.
How to Purge a Tank Water Heater (Gas & Electric)
This process is largely the same for both gas and electric tank water heaters, with minor differences in how you manage the power source. The whole process usually takes a few hours, especially if you let the water cool before draining.
1. Turn Off the Power Source: As emphasized earlier, safety comes first.
— For Electric Water Heaters: Go to your home's main electrical panel and flip the circuit breaker labeled for your water heater to the "OFF" position.
— For Gas Water Heaters: Locate the gas control valve on the water heater and turn it to the "PILOT" or "OFF" setting. You will need to relight the pilot light later.
2. Turn Off the Cold Water Supply: Find the cold water inlet valve at the top of your water heater (it is usually blue or marked "cold") and turn it clockwise until it is completely closed. This stops new water from entering the tank.
3. Open a Hot Water Faucet: Go to a hot water faucet inside your home, preferably one on an upper floor, and turn it on. This helps prevent a vacuum from forming in the tank and allows air to enter, which aids in draining. It also helps bleed air from the system later.
4. Connect Hose to Drain Valve: Locate the drain valve at the bottom of your water heater. It typically looks like a spigot. Attach one end of your garden hose to this valve.
5. Route Hose to Drainage: Direct the other end of the garden hose to a suitable drainage location. This could be a floor drain, a large utility sink, or outdoors in an area where hot, possibly sediment-filled water will not cause damage or harm plants. Water heaters often hold 40, 50, or more gallons of water, so ensure your drainage can handle the volume.
6. Drain the Tank: Carefully open the drain valve on the water heater. You should hear water flowing through the hose as the tank begins to empty. Draining can take anywhere from 20 minutes to an hour, depending on the tank size and the amount of sediment.
— Troubleshooting a Clogged Drain Valve: If water is not flowing, your drain valve might be clogged with sediment. Try briefly turning the cold water supply back on (with the drain valve still open) to create some pressure and dislodge the clog. You can also try gently blowing air back into the hose. If it remains clogged, you might need professional help.
7. Flush with Cold Water: Once the tank is mostly drained, leave the drain valve open. Now, slowly turn the cold water supply valve back ON for a few seconds, then turn it off. Repeat this a few times. This surge of cold water will stir up the sediment at the bottom of the tank and force it out through the drain valve and hose. Continue this process until the water coming out of the hose runs clear.
8. Close the Drain Valve and Refill the Tank: Once the water runs clear, close the drain valve tightly. Disconnect the garden hose. Then, fully open the cold water supply valve to begin refilling the water heater tank.
9. Purge Air from Faucets: As the tank refills, leave the hot water faucet you opened earlier (in step 3) turned on. You will hear sputtering and air escaping. Once water flows steadily and smoothly from the faucet, the tank is full and air has been purged from the hot water lines. Turn off the faucet.
10. Restore Power:
— For Electric Water Heaters: Go back to your electrical panel and flip the water heater's circuit breaker back to the "ON" position.
— For Gas Water Heaters: Turn the gas control valve back to the "ON" or desired temperature setting. You may need to relight the pilot light according to your unit's instructions. This process typically involves holding the pilot button down to purge air from the line until the pilot stays lit.
Proper maintenance, like purging, can help you avoid needing a full water heater installation in Sacramento CA sooner than expected.
How to Purge a Tankless Water Heater
Tankless water heaters operate differently than traditional tank models, and therefore, their "purging" process is also distinct. They do not accumulate sediment in the same way as tanked models because there is no tank for minerals to settle in. Instead, tankless units can develop lime and mineral deposits on their heating elements and in their narrow water passages, which can hinder efficiency and even damage the unit. This process is often called "descaling."
While some homeowners attempt this as a DIY task, it often requires a specialized tankless water heater flushing kit (including hoses, buckets, and a small circulation pump) and undiluted white vinegar. If your tankless water heater uses hard water, regular descaling is critical.
Here is a general overview of the descaling process for a tankless unit:
1. Isolate the Unit: Turn off the power (breaker for electric, gas valve for gas) and close the cold and hot water isolation valves connected to the tankless unit.
2. Connect Service Hoses: Locate the purge ports or service valves on your tankless water heater. These are typically small valves with caps. Remove the caps and connect the hoses from your descaling kit to these ports. One hose will go into a bucket of descaling solution, and the other will return to the bucket, forming a closed loop.
3. Circulate Solution: Open the purge port valves and use the circulation pump to pump the descaling solution (often undiluted white vinegar, unless the manufacturer specifies otherwise) through the tankless unit for 30–60 minutes, or as recommended by the manufacturer. This dissolves the mineral buildup.
4. Flush with Fresh Water: Once descaling is complete, turn off the pump, close the purge port valves, and disconnect the hoses. Flush the unit with fresh water to remove any remaining descaling solution.
5. Reconnect and Restart: Reconnect the main water lines, open the isolation valves, and turn the power or gas back on. Run a hot water tap for a few minutes to ensure all air is purged from the system.
Given the complexities and specific equipment required, many homeowners prefer to have a professional handle tankless water heater descaling. A damaged heat exchange due to limescale can reduce efficiency and may also pose serious risks like carbon monoxide emissions or even fire. If you need assistance with your tankless unit, especially after a new tankless water heater installation in Antelope CA, the Always Affordable Plumbing & HVAC team is ready to help.
After the Purge: Final Checks
You have successfully completed the purge. Now, it is time for a quick set of final checks to ensure everything is running smoothly.
• Check for Leaks: Carefully inspect all connections, especially the drain valve and any areas where you manipulated pipes. Tighten any connections that appear to be dripping. If you notice a persistent leak, consult the guide on how to fix a leaking water heater or call a professional.
• Monitor Operation: Listen to your water heater. It should be quieter than before, without the rumbling or popping sounds. Check your hot water supply; it should be consistent and hot.
• Note Maintenance Date: It is a good practice to write down the date of your purge on a tag attached to the water heater or in your home maintenance log. This helps you keep track of your annual maintenance schedule.
Frequently Asked Questions About Purging a Water Heater
We understand that maintaining a water heater can bring up a lot of questions. Here are some of the most common ones we hear about purging.
What's the difference between purging and draining a water heater?
While the terms "purging," "flushing," and "draining" are often used interchangeably in casual conversation, there is a subtle distinction.
• Draining simply means emptying the water from the tank. This might be done for repairs, winterizing, or as the first step in the purging process.
• Purging or Flushing specifically refers to the process of not just emptying the water, but actively removing accumulated sediment from the bottom of the tank. This involves draining, and then often introducing bursts of cold water to stir up and expel the sediment until the water runs clear.
So, draining is a component of purging, but purging has the specific goal of sediment removal to improve efficiency and extend the water heater's lifespan.
Can I damage my water heater by purging it?
If done improperly, it is possible to damage your water heater. Here are a few key risks to keep in mind:
• Electric Element Damage: For electric water heaters, if you turn the power back on before the tank is completely refilled with water, the heating elements can "dry fire" and burn out almost instantly. This is why turning off the breaker is critical.
• Stuck or Broken Drain Valve: Older drain valves, especially plastic ones, can become brittle or clogged with sediment. Forcing a stuck valve can cause it to break, leading to a significant leak.
• Exposing Older Issues: If your water heater is over 10 years old, the draining and flushing process can sometimes expose other, more serious issues that were previously sealed by sediment buildup. This does not mean flushing caused the problem, but rather revealed an underlying issue.
• Gas Line Issues: In addition to sediment flushing, if you are dealing with the gas line (for example, after a repair or replacement), improperly purging air from the gas line can be dangerous. For homeowners, the safest way to purge air from a gas line is to follow the manufacturer's instructions for relighting the pilot, which typically involves holding the pilot button down until the air is cleared.
Always follow the safety precautions and step-by-step instructions carefully. When in doubt, call a professional.
How often should I purge my water heater?
Most plumbers and manufacturers recommend that you drain and flush your water heater tank at least once a year. This annual maintenance is important, even if you are not experiencing any obvious issues.
However, the frequency might need to increase depending on your local water conditions:
• Hard Water Areas: If you live in an area with particularly hard water, like many parts of Sacramento, Elk Grove, or Folsom, you might consider purging your water heater every six months. Hard water contains higher concentrations of minerals that accelerate sediment buildup.
• Manufacturer Guidelines: Always check your water heater's operator's manual. The manufacturer may suggest a different frequency based on the specific model and design.
Regular, proactive maintenance helps save energy, extend the life of your water heater, and ensure you have a reliable supply of hot water.
Conclusion: Keep Your Hot Water Flowing
Understanding how to purge a water heater is a powerful tool in your home maintenance arsenal. This simple, yet critical, task can significantly impact your water heater's performance, longevity, and your household budget. By regularly flushing out sediment, you are not just preventing annoying rumbling noises and lukewarm showers; you are actively boosting efficiency, supporting a longer lifespan for your appliance, and helping ensure a consistent supply of hot water for your family in areas like Roseville, Citrus Heights, and Woodland.
While purging a tank water heater is a manageable DIY task for most homeowners, prioritize safety and know your limits. Remember to always turn off power or gas, allow water to cool, and wear protective gear.
When to Call a Professional
Sometimes, a DIY approach is not the best solution. Consider calling a professional if:
• You are uncomfortable with the process: Especially when dealing with gas or electricity.
• Your water heater is old: Units over 10 years old can be more susceptible to issues during flushing.
• You encounter problems: Such as a drain valve that will not open or close, persistent clogs, or new leaks after the purge.
• You have a tankless water heater: These require specialized descaling equipment and expertise.
• You suspect major issues: If the water remains cloudy after several flushing attempts, or if you hear unusual noises that persist.
At Always Affordable Plumbing & HVAC, our team is dedicated to providing comprehensive plumbing solutions for our community. Our experts serve Sacramento, Elk Grove, Roseville, Citrus Heights, Davis, Carmichael, Folsom, Rancho Cordova, Rocklin, North Highlands, Orangevale, Fair Oaks, Antelope, Lincoln, Woodland, West Sacramento, Galt, Granite Bay, Rio Linda, Elverta, Auburn, Loomis, Penryn, Wilton, Herald, Newcastle, Winters, Mather, Yolo, McClellan, Represa, and Sloughhouse. We are here to help whether you need routine maintenance, a complex repair, or a new installation. Do not let sediment get the best of your hot water—contact us for your water heater needs today.