Home Maintenance Troubleshooting: Fixing HVAC Short-Cycling & Stubborn Plumbing Clogs
Why is your HVAC short-cycling? See how basic home maintenance tips and troubleshooting prevent extreme weather breakdowns, and decide when to call a pro.



When you are looking for reliable home maintenance tips and troubleshooting, dealing with an air conditioning system that runs but fails to cool the house is one of the most frustrating challenges you can face. Our team at Always Affordable Plumbing & HVAC typically sees that your AC is running nonstop, but the air coming from the vents feels like a warm breeze. This sudden loss of cooling immediately creates a stressful environment in your home, leaving you to wonder if the entire system needs replacing or if there is a simple fix you can handle yourself.
The most critical decision point you face right now is knowing which quick checks are completely safe for you to perform and which require the expertise of a licensed HVAC professional. Identifying the root cause of an AC system blowing warm air does not always require a service call, but crossing the line into dangerous DIY repairs can cause severe damage to your equipment. This guide provides a strict, safety-first approach to diagnosing your cooling issue so you can restore your home's comfort without taking unnecessary risks.
While we are widely known for our residential plumbing services and professional drain and sewer clearing, Always Affordable Plumbing & HVAC is a comprehensive home service provider. We handle everything from sudden cooling emergencies to complex piping needs, ensuring your entire home operates safely and efficiently.
To safely troubleshoot an air conditioner that is blowing warm air, you first need to understand how the system is supposed to work. In our experience, most homeowners believe that an air conditioner "creates" cold air and pushes it into the house. In reality, your AC system is designed to remove heat from your indoor air and transfer it outside.
Your central cooling system relies on a continuous relationship between three main components: the thermostat, the indoor evaporator coil, and the outdoor condenser. The thermostat acts as the brain, telling the system when the house is too warm. The indoor evaporator coil absorbs the heat from your indoor air, and the outdoor condenser releases that absorbed heat into the outside atmosphere. If there is any interruption in airflow, electrical supply, or the refrigerant cycle between these components, the heat transfer process stops. The blower motor will continue pushing air through your ductwork, but because the heat is not being removed, that air will feel warm.
Because the cooling cycle relies on high-voltage electricity and pressurized chemicals, your safe diagnostic steps are strictly limited to checking airflow and basic electrical settings. Leave the sealed mechanical components to the professionals.
For your home to cool down, warm indoor air must pass directly over the cold indoor evaporator coils. The refrigerant inside those coils absorbs the heat, and the newly cooled air is pushed back into your living spaces. Restricted airflow is the single most common non-mechanical reason for warm air blowing from vents.
• Thermostat — Primary Function: Monitors indoor temperature and signals the system to turn on or off. — What Happens If It Fails: System may not turn on, or the fan runs without the cooling cycle engaging.
• Indoor Blower — Primary Function: Pulls warm air from the house and pushes it over the cold evaporator coil. — What Happens If It Fails: Air stops flowing through vents entirely, leading to a frozen indoor coil.
• Evaporator Coil — Primary Function: Absorbs heat and humidity from the indoor air using cold refrigerant. — What Happens If It Fails: If dirty or frozen, it cannot absorb heat, causing warm air to blow into the home.
• Outdoor Condenser — Primary Function: Compresses the refrigerant and releases the absorbed indoor heat outside. — What Happens If It Fails: Heat remains trapped in the system; indoor vents blow unconditioned, warm air.
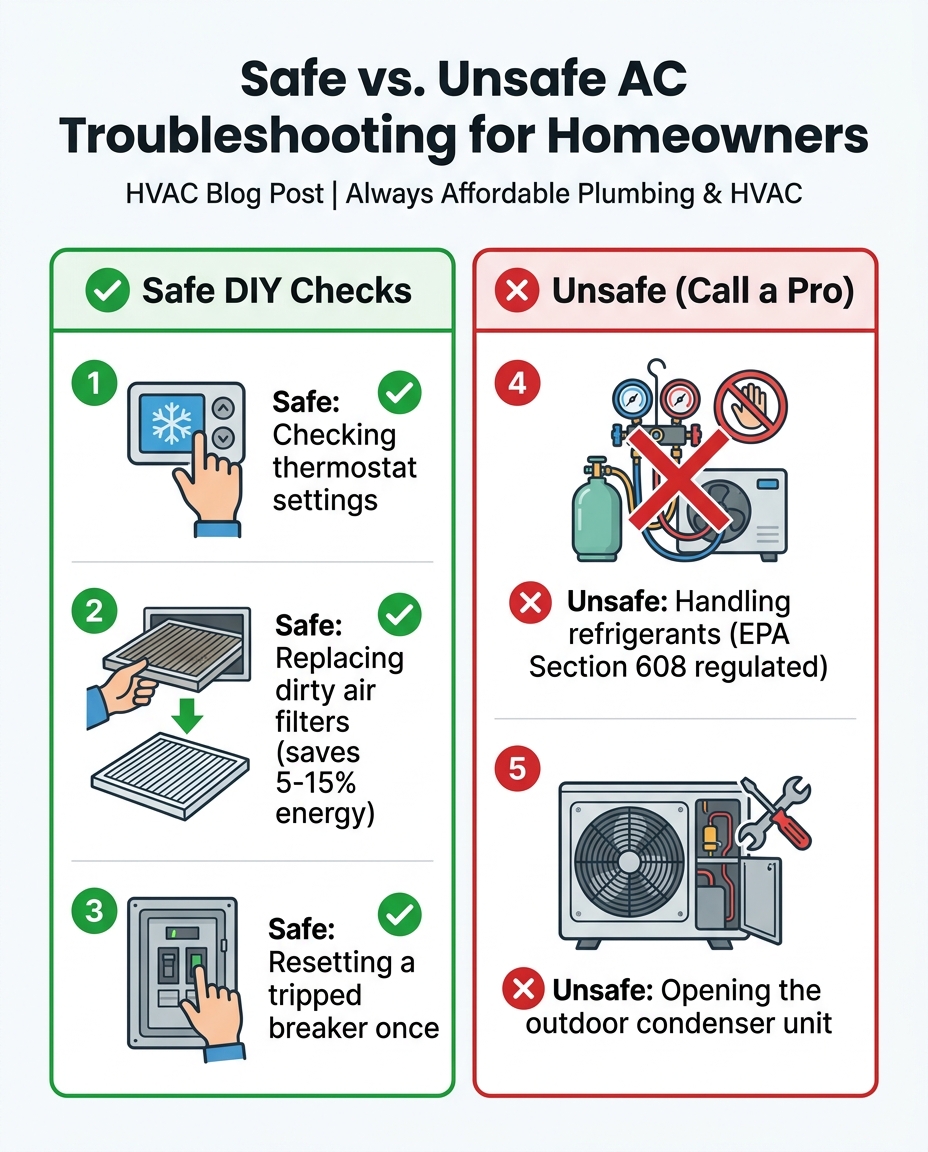
The very first and easiest safe check you should perform is verifying your thermostat operations. In fact, our dispatchers find that a surprising number of "broken AC" service calls in the local area are resolved by simply adjusting a bumped setting or replacing a dead battery. Before you assume the worst about your mechanical equipment, walk over to your wall unit and run through these essential checks.
1. Verify the cooling mode: Ensure the system is actually set to "Cool" and not "Heat" or "Off." It sounds simple, but a quick bump from a passing shoulder or a curious child can easily change the primary setting.
2. Check the fan setting: Look closely at the fan switch. It should be set to "Auto" rather than "On." When the fan is set to "On," the indoor blower motor runs constantly, even between cooling cycles. This means it will blow unconditioned, warm air through your vents while the outdoor compressor is resting. Setting it to "Auto" ensures the fan only blows when the air is actively being cooled.
3. Evaluate the thermostat temperature differential: This is a crucial diagnostic concept. The thermostat temperature differential is the allowed fluctuation in degrees before the system kicks on (usually one to two degrees). If your thermostat is set to 72 degrees but the room is 74 degrees and the system has not engaged, the thermostat may be reading the temperature incorrectly or failing to send the signal to the control board.
4. Replace the batteries: If the digital display is blank, unresponsive, or acting erratically, pop the faceplate off and replace the batteries. Low voltage from dying batteries can cause the thermostat to lose its connection to the main HVAC control board, resulting in the fan running without the cooling cycle.
If you have confirmed that the thermostat is functioning properly, set correctly, and the air is still warm, you can safely move on to the next diagnostic step.
If the thermostat is not the culprit, you must immediately check your airflow. The problem of restricted airflow is the most common maintenance-related cause of AC issues. When airflow is blocked, the entire heat exchange process breaks down.
The Problem: Your air conditioner needs a massive, uninterrupted volume of air flowing over the indoor evaporator coil to function. When something blocks this air, the coil gets too cold because there is no warm house air to absorb the chill.
The Cause: A pattern we see often on our service calls is a dirty, clogged HVAC air filter. When the filter becomes caked with dust, pet hair, and household debris, the blower motor cannot pull enough air through the system. The temperature of the indoor coil drops rapidly until the condensation on the coil freezes into a solid block of ice. Once the coil is encased in ice, air cannot pass through it at all, and the system will simply blow whatever warm air it can bypass around the blockage.
The Solution: You must locate, inspect, and replace your air filter. Turn off your HVAC system completely at the thermostat before opening the filter cabinet. Pull the filter out and hold it up to a light source. If you cannot see light shining through the material, the filter is completely clogged and must be replaced immediately. According to Department of Energy data, replacing a dirty filter with a clean one can lower your air conditioner's energy consumption by 5% to 15%, while instantly restoring proper airflow.
During the peak summer cooling season, your air conditioner runs at maximum capacity. Our technicians routinely see how extreme summer heat loads in the local area can rapidly escalate minor airflow restrictions into complete system failures. A dirty filter that might just cause slight inefficiency in the spring can cause a total system freeze-up during a July heatwave. Proactive home care is the best defense against these sudden failures. Just as joining a routine plumbing maintenance club prevents unexpected pipe disasters, keeping up with regular HVAC filter changes prevents sudden airflow breakdowns.
Central air conditioning systems are split systems, meaning the indoor blower and the outdoor condenser operate on completely separate electrical circuits. It is entirely possible for the indoor unit to have full power while the outdoor unit has none.
If the breaker for the outdoor unit trips, the indoor fan will continue to pull air from your house and push it through the vents. However, because the outdoor compressor is not running, no heat is being removed, and the indoor fan will just blow warm air. You can safely check your main electrical panel for a tripped breaker. Look for a switch that has moved to the middle, neutral position.
The reset rule: You may flip the breaker completely to the "Off" position, and then firmly back to the "On" position. You should only do this exactly once. If the breaker immediately trips again, or trips after a few minutes of operation, stop. In our experience, a repeatedly tripping breaker indicates a serious electrical short or a failing compressor that is pulling too much amperage. Forcing it back on can cause an electrical fire or destroy the equipment.
After checking the breaker, walk outside to your condenser unit. You are looking for obvious, external issues that are safe for a homeowner to address:
• Heavy debris and blockages: Look for overgrown bushes, tall grass, or piles of leaves packed against the metal fins. The outdoor unit needs at least two feet of clear space in all directions to exhaust the heat it pulls from your home. Cleaning around the unit is perfectly safe.
• Ice on the refrigerant lines: Look at the copper pipes running from the outdoor unit into your house. If they are covered in thick white frost or solid ice, your system is frozen. Turn the system completely off to let it thaw and call a professional.
• Unusual humming or buzzing: Listen to the unit without touching it. If the fan on top is not spinning, but you hear a loud, angry buzzing sound, the system is trying to start but failing. Turn it off at the thermostat immediately to prevent compressor damage.
Remember, clearing away yard debris is safe homeowner maintenance. However, opening the metal cabinet of the outdoor unit is strictly off-limits.
There is a hard boundary between basic home maintenance and dangerous DIY work. Anything involving the internal wiring, the high-voltage capacitors, or the refrigerant lines requires a licensed professional. Crossing this line puts your safety, your equipment, and the environment at risk.
Modern air conditioners operate using pressurized chemical refrigerants. Under EPA Section 608 regulations, handling, recovering, or charging these environmental and safety hazards requires specific federal certification. Refrigerant is kept under immense pressure; a mistake can cause severe frostbite, chemical burns, or dangerous exposure.
We strongly recommend avoiding DIY refrigerant recharge kits sold at auto parts or hardware stores. Home HVAC systems do not "consume" refrigerant like a car consumes oil. If your system is low on refrigerant, it means there is a physical leak in the copper lines or coils. Adding a DIY kit does not fix the leak; it simply forces the wrong chemical blend, along with moisture and outside air, into your delicate compressor. This almost always results in complete compressor failure, turning a repairable leak into a total system replacement.
Using the wrong DIY approach on an air conditioner is just as ineffective and messy as not understanding why your plunger fails on modern low-flow toilets. When you use the wrong tool or tactic for a complex mechanical problem, you usually make the original issue much worse.

If you have verified that the thermostat is set correctly, the air filter is completely clean, and the outdoor breaker is firmly in the "On" position, you have successfully ruled out the common homeowner fixes. The issue causing your AC to blow warm air is mechanical, and calling a professional is the correct next step.
When an Always Affordable Plumbing & HVAC technician arrives at your home, they use specialized diagnostic tools to check the internal components safely. Common mechanical failures a pro will check include:
• Bad capacitors: The capacitor stores energy to jump-start the outdoor compressor and fan. If it fails, the outdoor unit will not run, even if it has power.
• Refrigerant leaks: Technicians use advanced pressure gauges and electronic leak detectors to find microscopic holes in the copper lines, repair the leak, and recharge the system with the exact chemical weight required by the manufacturer.
• Failing compressors: The compressor is the heart of the system. A technician can test its electrical draw to see if it is failing internally.
• Failing blower motors: If the indoor fan is struggling to move air despite a clean filter, the motor itself may be burning out.
Professional diagnostics remove the guesswork and restore your comfort safely. At Always Affordable Plumbing & HVAC, we offer transparent pricing and a 100% satisfaction guarantee when a professional repair is required. We want you to feel confident that the diagnosis is accurate and the repair is built to last. When you book your diagnostic visit, be sure to ask about our plumbing service promotions and seasonal HVAC service offers that can help offset the cost of necessary repairs.
Dealing with an air conditioner that blows warm air is stressful, but taking a systematic approach to troubleshooting puts you in control. Avoiding unnecessary service calls for simple issues like a bumped thermostat or a clogged filter empowers you as a homeowner. However, recognizing your limits is just as important. Stay away from dangerous DIY electrical work or illegal refrigerant handling.
By following these safe diagnostic criteria, you protect your equipment from further damage and ensure your family stays safe. When the basic checks do not solve the problem, reach out to a local expert for reliable, safe diagnostics to restore your home comfort quickly. If your home is heating up and the safe checks haven't worked, schedule an inspection with a licensed professional today.
Why is my AC running but blowing warm air?
In our experience diagnosing systems in the local area, if your AC is running but blowing warm air, it usually means the indoor blower is working but the heat exchange process has failed. This is most commonly caused by a clogged air filter, a tripped breaker to the outdoor unit, or a mechanical issue like a refrigerant leak. Start by checking your thermostat settings and inspecting your air filter for heavy dust buildup. If those are clear, the outdoor compressor may not be engaging.
How do you fix an air conditioner that is not cooling?
You can fix minor cooling issues by replacing a dirty air filter, ensuring the thermostat is set to "Auto" instead of "On," and clearing yard debris away from the outdoor condenser. These safe homeowner checks resolve many common airflow problems. However, if the system has a frozen coil, a bad capacitor, or low refrigerant, you must hire a licensed HVAC professional to fix the mechanical components.
When should I call an HVAC professional for my AC?
You should call an HVAC professional immediately if your basic homeowner checks—verifying the thermostat, changing the filter, and checking the breaker—do not restore cold air. You also need a professional if you see ice forming on the copper refrigerant lines or hear loud buzzing sounds coming from the outdoor unit. Never attempt to open the equipment cabinets or touch the internal wiring yourself.
Can I add refrigerant to my home AC myself?
No, you cannot safely or legally add refrigerant to your home AC yourself. Handling HVAC refrigerants requires EPA Section 608 certification due to strict environmental and safety regulations. Using DIY recharge kits often forces the wrong chemical blend and moisture into the system, which can completely destroy your compressor and require a massive replacement.
How often should I change my AC filter in the summer?
During the heavy usage of the summer months, you should check your AC filter every 30 days and replace it at least every 60 to 90 days. Homes with multiple pets, heavy dust, or occupants with allergies may need to change the filter every single month. A clean filter is the most effective way to prevent sudden airflow restrictions and keep the system from blowing warm air.
What is a normal thermostat temperature differential?
A normal thermostat temperature differential is typically one to two degrees Fahrenheit. This means if you set your thermostat to 72 degrees, the system will wait until the room reaches 73 or 74 degrees before turning on to prevent constant short-cycling. If your home gets much warmer than the set temperature before the system engages, the thermostat may be malfunctioning and require professional calibration or replacement.
See what our satisfied customers have to say about their experience with Always Affordable
Plumbing & HVAC.

"Chappy was very skilled in his knowledge of my HVAC unit. I greatly appreciate the quick response and experienced tech. The whole endeavor was made less stressful by his humor and honest conversation. I find comfort in knowing I now have a shop i trust for the next time."
"Tony, James, Ronnie did an amazing job setting up our new AC! They were quick, efficient, considerate, and polite! We appreciate them scheduling us in on such short notice. Definitely recommend this company!"
"Prompt, professional service with kindness and care. They came out to address both plumbing and AC issues. I received a courtesy call before they arrived. All issues were resolved the same day with integrity and respect. Thankful for businesses like this. Absolutely recommend to those that I love."
"Excellent service! Jason came out promptly and in addition to doing my outside faucet he also put in new irrigation equipment! All done perfectly! Jason was lovely"
"Honest with the assessment; friendly and good manners. No high pressure sales. Just good to honest "tell it like you see it" Thought my kitchen disposer needed an overhaul. But Jason, there Plumber gave me an honest lesson on what was really happening. Saved me hundreds, if I went the route of replacing. Thank you!"
"Absolutely 5 stars. If you are looking for affordable ,professional and kind. Chappy was excellent and very knowledgeable . I called in the morning because my air conditioner stopped working he was here within hours and fixed my air with a smile. I highly recommend Chappy and Always Affordable plumbing and Hvac."
"Scott and James were great. They got there quickly and diagnosed the problem with my A/C.They did a very thorough job testing everything. Sent me pictures and called to keep me informed. Got it done the next day and everything is working fine. Be glad when I get home so I can enjoy my new system. Thanks guys for a great job."
"Chappy was very helpful. He knew our issue right away, cleaned our coils. He also came on the same day we called and got our AC blowing cold air again."
"After some timing ’curfuffles’ the Tech Jason arrived and not only completed a speedy install on my toilet, he was personable & professional. Because of the timing issues Jason was attentive and showed up with everything needed! No extra store runs 😊 I was very comfortable with having this Tech in my Daughter’s home. We will definitely use this Service again."