Why Your Heat Pump Sounds Like It's Venting Steam On Cold Valley Mornings
See why your outdoor unit vents steam on freezing mornings. Having the heat pump defrost cycle explained helps you decide when to call a pro for peace of mind.


A widespread myth in home maintenance is that a kettle of boiling water is the ultimate cure for a sluggish kitchen sink, but in our years of serving the local area at Always Affordable Plumbing & HVAC, we have found that safely removing and cleaning sink p traps is the only guaranteed way to clear a severe blockage. When dealing with a stubborn grease clog, many homeowners assume that high heat will simply melt the blockage away and restore normal flow. While hot water may temporarily liquefy surface fats, it fails to address the core problem of solidified grease blockages in kitchen sink P-traps. Continuing to flush a clogged drain with boiling water can actually warp and damage standard PVC plumbing pipes over time, turning a simple clog into a costly leak.
If you are dealing with recurring slow drains and want to avoid causing permanent damage to your pipes, it is time to look into professional plumbing services or specialized sewer and drain clearing to resolve the root cause of the issue.
The limits of thermal clearing: Most residential plumbing systems utilize PVC piping beneath the sink. Standard PVC is rated to handle water temperatures up to 140 degrees Fahrenheit. Because boiling water reaches 212 degrees Fahrenheit, repeatedly pouring kettles of boiling water down the drain stresses the plastic slip joints, degrades the rubber gaskets, and can lead to immediate leaks under the cabinet. The most effective, safe, and reliable first step for any homeowner dealing with a slow kitchen drain is to bypass the boiling water entirely and focus on safely removing and cleaning sink p traps manually.
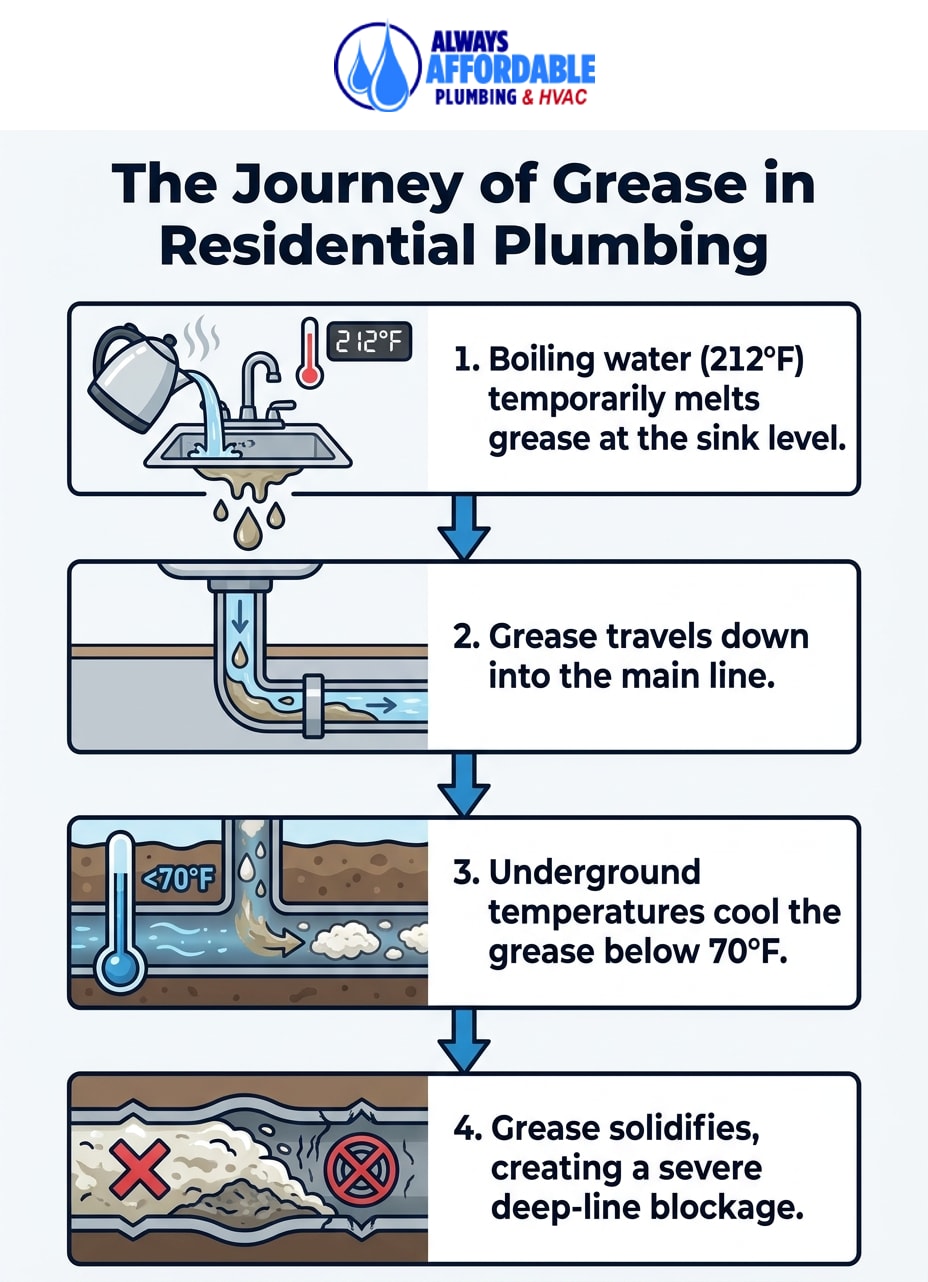
We often explain to our customers that understanding the science behind grease clogs reveals exactly why manual intervention is required. Grease, fats, and oils undergo a rapid phase change based on ambient temperatures inside residential plumbing lines. When you pour hot grease down the drain, it is in a liquid state. As it travels further away from the warm kitchen sink, it cools.
When you pour boiling water onto a grease clog, it temporarily melts the fats at the surface level. This makes it seem like the drain is clearing because the water suddenly goes down. However, our team typically sees that the boiling water simply pushes the liquefied grease deeper into the plumbing system.
Once the grease reaches the underground main lines, the environment changes drastically. The ambient temperature in subterranean pipes is typically much cooler. As the liquefied fats hit the solidified grease temperature thresholds—generally cooling below 70 degrees Fahrenheit—they rapidly harden again. Instead of a localized clog under the sink, you have now created a much more severe, inaccessible blockage deep within the main sewer line.
Understanding this thermodynamic process highlights why mechanical removal at the trap is vastly superior to thermal attempts. By physically extracting the grease before it travels into the deep lines, you prevent catastrophic blockages.
• Boiling Water — Critical Temperature Threshold: 212°F (100°C) — Plumbing Impact: Temporarily melts grease, pushes it deeper.
• Standard PVC Pipe — Critical Temperature Threshold: 140°F (60°C) Max Rating — Plumbing Impact: Can warp, weaken, or leak if exposed to boiling water.
• Kitchen Grease & Fats — Critical Temperature Threshold: Solidifies below ~70°F (21°C) — Plumbing Impact: Hardens rapidly in underground pipes, creating severe clogs.
The U-shaped bend beneath your kitchen sink does much more than just catch dropped wedding rings or large food scraps. It is a critical component of your home's sanitation system. The P-trap is specifically designed to hold a small amount of water at all times, creating an airtight seal between your home's interior and the municipal sewer system.
Preventing sewer gases: This standing water seal prevents hazardous and foul-smelling sewer gases—like methane and hydrogen sulfide—from rising out of the sewer lines and entering your kitchen. When grease and food particles accumulate in this curve, the water flow is restricted, leading to the classic slow-draining sink. Because the trap is the lowest point before the pipe exits through the wall, it is the natural collection zone for heavy sludge.
Environmental factors: It is also important to note how local climate affects this plumbing component. During hot, dry summers in the local area, our technicians frequently notice that water in unused P-traps—such as those in guest bathrooms or garage utility sinks—can evaporate quickly. When the water evaporates, the seal breaks, allowing those dangerous sewer gases inside. Routine usage and maintenance ensure this component functions correctly.
Maintaining this component through routine manual cleaning ensures both proper drainage and a safe indoor environment. By keeping the trap clear of debris, you prevent grease from reaching the solidified grease temperature thresholds deeper in the system, protecting your entire plumbing infrastructure.
Before dismantling the plumbing beneath your sink, proper preparation is necessary to prevent water damage and ensure a smooth process. Safely removing and cleaning sink p traps requires only a few basic household items, but having them staged beforehand makes the job significantly easier.
• A properly sized bucket: Gather a small bucket or a large plastic mixing bowl that fits easily beneath the U-bend to catch the standing water and residual sludge housed within the trap.
• Protective towels: Have several old towels on hand. Lay them down to protect the wooden cabinet floor from accidental spills, foul-smelling water, or drips during the removal process.
• Rubber gloves: The sludge inside a kitchen sink trap is often a combination of rotting food, grease, and bacteria. Thick rubber gloves will protect your hands and improve your grip on the plumbing components.
• A flexible bottle brush: You will need a slender, flexible brush to scrub out the curved interior of the pipe once it is removed.
Identifying the slip nuts: Look at the P-trap to identify the slip nuts securing it in place. These large, ridged rings are typically designed to be loosened and tightened by hand rather than with heavy tools. Avoid using a metal wrench or channel-lock pliers on standard PVC slip nuts unless absolutely necessary. Excessive mechanical force can easily crack the plastic threads, warp the pipe, and cause permanent damage that requires a full replacement.
Taking apart the plumbing under your sink can feel intimidating, but it is a straightforward process when done methodically. Following a step-by-step approach ensures you are safely removing and cleaning sink p traps without damaging the delicate plastic threads or losing small sealing washers.
1. Position the catch bucket: Place your bucket directly beneath the lowest point of the P-trap to catch the water seal and any trapped debris that will immediately spill out.
2. Loosen the slip nuts: Manually unscrew the slip nuts on both ends of the trap (the one connecting to the vertical tailpiece from the sink, and the one connecting to the horizontal wall pipe). Turn them counterclockwise. If they are stuck, use a dry rag for better grip.
3. Detach the U-bend: Carefully lower the curved trap section and empty its contents into the bucket. Note any heavy grease accumulation or foreign objects that may have caused the blockage.
4. Scrub the interior: Take the detached P-trap to a different sink or an outside hose. Use a flexible bottle brush and warm, soapy water to thoroughly scrub the inside of the trap, removing all hardened fats, biofilm, and food particles.
5. Inspect the wall pipe: Before reassembling, shine a flashlight into the main pipe leading into the wall. Ensure the immediate entry point is also clear of localized buildup. If you see deep sludge here, you may need to research the best way to clean drain pipes beyond the trap.
Once the trap is completely clear of debris, putting it back together correctly is just as important as taking it apart. Improper reassembly is the leading cause of under-sink water damage following a DIY repair.
Inspect the seals: Examine the rubber or plastic O-rings (also known as slip joint washers) for signs of wear, cracking, or flattening. These small rings create the watertight seal between the pipes. If they appear degraded or brittle, replacing them now costs only a few cents and prevents future headaches.
Align the threads carefully: Align the cleaned P-trap carefully with the vertical tailpiece and the horizontal wall pipe. Ensure the pipes slide together straight. When you begin turning the slip nuts, the threads should engage smoothly. If you feel resistance immediately, stop and realign the pipe to ensure the threads seat properly without cross-threading.
Hand-tighten only: Hand-tighten the slip nuts securely, but avoid over-tightening. Cranking them down with excessive force can deform the washers, crack the plastic nuts, and actually cause immediate leaks. Once reassembled, run cold water down the sink for several minutes. While the water is running, observe the joints closely with a flashlight and run a dry paper towel around the connections to confirm a perfectly watertight seal. Safely removing and cleaning sink p traps is only successful if the system remains dry afterward.
Sometimes, you follow all the manual cleaning steps perfectly, reassemble the plumbing, and the sink still fills up with water. This diagnostic reality means the localized sink plumbing is not the issue.
If water continues to back up after the P-trap has been thoroughly cleaned, the blockage has moved deeper into the plumbing system. This behavior indicates that the solidified grease or debris has bypassed the under-sink plumbing and formed a blockage further down the branch lines or inside the main sewer line.
Deep-line clogs occur in areas where the ambient underground temperature allows fats to harden completely. Once the grease hits those solidified grease temperature thresholds beneath the house or out in the yard, it turns into a dense, concrete-like mass that traps other debris.
Attempting to push chemical drain cleaners into a deep blockage is highly ineffective and leaves hazardous, corrosive chemicals sitting stagnant in your pipes. Instead, these clogs require specialized mechanical augers or high-pressure hydro-jetting to resolve safely. If you reach this point, checking your local plumbing service areas for professional help is the safest next step. At Always Affordable Plumbing & HVAC, a pattern we see often is homeowners stressing over deep-line blockages. We are committed to transparent, affordable pricing—reassuring homeowners that if DIY trap cleaning reveals a deeper main line blockage, they will receive honest diagnostic advice without hidden fees or surprise charges.
If your trap is clear but the sink won't drain, the blockage is located further down the branch line or the main sewer line. This happens when grease and debris bypass the sink plumbing and solidify deep within the walls or underground. Resolving this requires professional equipment, such as a plumbing snake or hydro-jetter, to reach and clear the obstruction.
Boiling water temporarily melts grease at the surface level, but it ultimately pushes the liquefied fats deeper into the plumbing system. Once that grease reaches the cooler underground pipes, it solidifies again, creating a much worse clog. Additionally, boiling water can warp and weaken standard PVC plumbing pipes.
To safely clean a trap, place a bucket underneath it to catch standing water, then hand-loosen the slip nuts on both ends. Remove the U-shaped pipe and scrub it out manually with a flexible bottle brush and warm, soapy water. Safely removing and cleaning sink p traps manually is the most effective way to clear localized kitchen clogs.
No, it is generally not safe to pour boiling water down a modern kitchen sink. Doing so risks damaging the PVC plumbing joints and exacerbating grease clogs by pushing fats further into the sewer line. Stick to warm tap water and manual cleaning methods instead.
If a P-trap dries out due to evaporation, the protective water seal breaks. This allows harmful and foul-smelling sewer gases, such as methane and hydrogen sulfide, to rise from the municipal sewer system and enter your living space. Running water through unused sinks periodically prevents this issue.
Tackling home maintenance issues on your own can be highly rewarding. Safely removing and cleaning sink p traps is a manageable and highly effective first step for any homeowner dealing with a slow kitchen drain. By relying on mechanical removal instead of pouring boiling water or harsh chemicals down the sink, you protect your pipes from unnecessary wear and tear.
However, when manual cleaning fails to restore normal water flow, it is time to stop DIY efforts to prevent accidental damage to the broader plumbing system. A clean trap that still backs up is a definitive sign of a deep-line blockage. Based on our extensive field experience, professional diagnostics can pinpoint the exact location of these stubborn clogs and clear them safely using specialized equipment. We recommend exploring professional drain clearing options to resolve deep blockages, restore your home's sanitation, and protect your plumbing infrastructure for the long term.
See what our satisfied customers have to say about their experience with Always Affordable
Plumbing & HVAC.

"Chappy was very skilled in his knowledge of my HVAC unit. I greatly appreciate the quick response and experienced tech. The whole endeavor was made less stressful by his humor and honest conversation. I find comfort in knowing I now have a shop i trust for the next time."
"Tony, James, Ronnie did an amazing job setting up our new AC! They were quick, efficient, considerate, and polite! We appreciate them scheduling us in on such short notice. Definitely recommend this company!"
"Prompt, professional service with kindness and care. They came out to address both plumbing and AC issues. I received a courtesy call before they arrived. All issues were resolved the same day with integrity and respect. Thankful for businesses like this. Absolutely recommend to those that I love."
"Excellent service! Jason came out promptly and in addition to doing my outside faucet he also put in new irrigation equipment! All done perfectly! Jason was lovely"
"Honest with the assessment; friendly and good manners. No high pressure sales. Just good to honest "tell it like you see it" Thought my kitchen disposer needed an overhaul. But Jason, there Plumber gave me an honest lesson on what was really happening. Saved me hundreds, if I went the route of replacing. Thank you!"
"Absolutely 5 stars. If you are looking for affordable ,professional and kind. Chappy was excellent and very knowledgeable . I called in the morning because my air conditioner stopped working he was here within hours and fixed my air with a smile. I highly recommend Chappy and Always Affordable plumbing and Hvac."
"Scott and James were great. They got there quickly and diagnosed the problem with my A/C.They did a very thorough job testing everything. Sent me pictures and called to keep me informed. Got it done the next day and everything is working fine. Be glad when I get home so I can enjoy my new system. Thanks guys for a great job."
"Chappy was very helpful. He knew our issue right away, cleaned our coils. He also came on the same day we called and got our AC blowing cold air again."
"After some timing ’curfuffles’ the Tech Jason arrived and not only completed a speedy install on my toilet, he was personable & professional. Because of the timing issues Jason was attentive and showed up with everything needed! No extra store runs 😊 I was very comfortable with having this Tech in my Daughter’s home. We will definitely use this Service again."